Transitions

Overview
Transitions are lists of one or more various types of animated effects to apply to an object. Use them to visually transition an object from one state to another.

Various object types (such as controls and panels) support transitions. Transitions can be edited using either an editor, or an inspector interface (Unity desktop only).
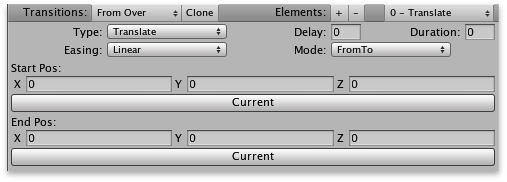
stacks_image_EB7EA13F-D7D6-4B3E-9E7B-AF2387F9BCCA

Transition editor

stacks_image_C78A79D8-20AB-4AC5-84A5-5E8F4F14E74B

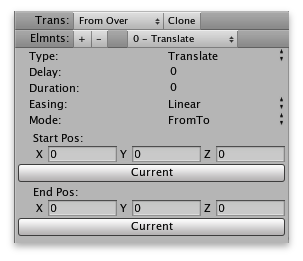
Transition inspector (Unity desktop only)

Using Transitions

Select a Transition
To setup a transition, first you must select which transition you would like to setup. This can be done using the "Transitions" popup list. The "Clone" button next to this popup allows you to copy all settings from the currently selected transition to all other transitions in the popup list. After which, any changes you make to the current transition will be automatically reflected in the other transitions. This will continue to be the case until you make a change to one of the other transitions directly, at which point that other transition will no longer automatically pick up the settings of the first.

TIP

If you want to delete all transition elements for all transitions for a given control state, delete all the elements by clicking the "-" button repeatedly in one of the transitions, and then click the Clone button to force the other transitions for that state to be empty as well.
Add Elements
A transition is composed of one or more "elements". An "element" is an animation effect (internally, each is a class derived from EZAnimation). For a transition to do anything, it must have at least one element. To add or remove elements to to/from the transition, use the "+" and "-" buttons. Once you have added elements, you can select from among them using the popup list next to the "+" and "-" buttons. This is a list of all elements in the selected transition.

Select a Type
There are many types of animation effects you can apply. Below is a list of most such effects:
Fades a sprite or control to a specified color.
Moves an object to a given position, or by a certain distance.
Like crash, but moves in a smother, more connected manner. The effect diminishes linearly over time.
Scales an object by a certain magnitude in a bouncy way, and then settles back to its original scale.
Shakes an object by rotating it back and forth a certain number of times by a certain amount on each axis.
Fades the volume of an attached AudioSource from one value to another.
Fades the material of a TextMesh (3D Text) object to a specified color.
NOTE: Use carefully as modifying an object's material properties at runtime will cause the object in question not to be batched, resulting in additional draw calls.
Shakes an object randomly as if it had crashed or experienced an explosion. The effect diminishes linearly over time.
Scales an object.
Rotates an object by a certain amount in a bouncy way, and then settles back.
Plays the specified AnimationClip on the object. Can also play clips created in Unity's Animation editor (must set duration and blending to 0).

NOTE: The Duration setting for this type refers to how long it should take for the new clip to fade in. If you want the clip to begin playing fully immediately, set Duration to 0. Also note that a Blend Weight setting of 1 is required for the clip to take full effect.
Fades an object's material to a specified color.
NOTE: Use carefully as modifying an object's material properties at runtime will cause the object in question not to be batched, resulting in additional draw calls.
Moves an object a certain amount in a bouncy way, and then settles back to its original position.
Shakes an object back and forth at a regular rate and amount.
Rotates an object about its axis by degrees on each axis, specified in angles.
Shakes an object by rotating it back and forth a certain number of times on each axis by a certain amount on each axis. The effect diminishes linearly over time.
Changes the pitch of an attached AudioSource over time.
Delay and Duration
An animation effect (or transition "element") lasts a certain amount of time, specified in seconds. You can also cause the element to loop infinitely by specifying a negative duration. For example, if you specify a duration of -1, the effect will loop every 1 second. Next, choose a delay, also specified in seconds. This is the length of time the effect will wait before starting. This allows you to have multiple effects appear to occur sequentially by delaying one effect to occur after another. Additionally, if delay is set to a negative value, two more options will appear: "Rep. Delay", which repeats the specified delay on each iteration, and "PingPong" which will cause the animation to reverse upon reaching the end.

Easing
The "Easing" popup allows you to select the manner in which the starting value transitions to the destination value. For example, using "Linear" with a "Translate" type will move an object from point A to point B in a linear manner. But using "ElasticOut" will cause the object to move toward point B in a manner that looks as if it is attached to point B by a rubber band. There are too many easing methods to list here, so you are encouraged to experiment with each.
NOTE: Easing is not selectable on some types, such as PunchPosition.

Mode
There are three modes to choose from:

  • To - Transitions to a specific target value from whatever the current value happens to be.
  • By - Transitions whatever the current values are by the amount specified.
  • FromTo - Transitions the object from the specified starting value to the specified destination value.

NOTE: Mode selection is not available for some types, such as PunchPosition.

Set Values
To complete the setup of your transition element, fill in the values at the bottom which are relevant to your chosen type. This varies widely based upon the type of element selected. Note that for most types, these values have a different meaning in the context of the selected Mode. For example, if the type is set to Translate, setting the mode to To will cause the object to move to the specified point in space. But if the mode is set to By, it will move by the specified amount relative to whatever its present location happens to be.

When applicable, a "Current" button will appear below the value field(s) which, when clicked, will paste in the object's current values.

TIP

You can easily duplicate all transition settings from one control/panel to one or more others at a time using the Copy/Paste Transitions menu item. Just click Custom->Copy Transitions when a control or panel is selected, and click Custom->Paste Transitions when one or more controls or panels are selected, allowing you to paste to multiple controls and panels at a time. You can even mix and match.

Control Transitions

Controls, such as Buttons, allow you to setup multiple transitions per control state. For example, the "Over" state of the Button control allows you to setup a different state when transitioning from the "Normal" state versus the "Active" state. This means you can have one thing occur when coming from one state, and a different thing when coming from another. The currently selected state is always the state being transitioned to, and each transition should begin with "From..." to indicate the state from which it will transition.

Panel Transitions

UIPanels, and all UIPanelBase-derived panel classes include at least 4 base transition types:

  • Bring In Forward - Used to display the panel when a menu is moving in the "forward" direction.
  • Bring In Back - Used to display the panel when a menu is moving in the "back" direction.
  • Dismiss Forward - Used to dismiss a panel from view when a menu is moving in the "forward" direction.
  • Dismiss Back - Used to dismiss a panel from view when a menu is moving in the "back" direction.

When using panels with a UIPanelManager, you can use these transitions to create a smooth-flowing menu or wizard. When moving "forward" in the menu/wizard, the "forward" transitions are used, and when moving backward, the "back" transitions are used.

When using panels apart from a manager, most controls, etc, which interface with panels will use the "forward" transitions by default, so these are the ones you should setup in such a case. Aside from this, you can always initiate these transitions directly from code.

Block Input
The 4 base transitions listed above also have a special "Block Input" selection that appears next to the "Clone" button in the transition editor area. When enabled, this setting causes the UIManager to not process input while the transition is taking place. This is useful to avoid the user accidentally clicking on buttons, etc, as they travel across the screen while a panel is being dismissed/brought in. Input will be re-enabled immediately upon completion of the transition.

Some other panel types, such as UIInteractivePanel, include additional transitions for when the panel enters a given state based upon input. This is very similar to how transitions work for controls.