Troubleshooting
Changes do not show up
Depending on your situation, there are several reasons why changes you make to a sprite may not show up. See the list below for the ones that may apply to your situation. Rebuild Atlases If the changes you have made involve assigning new/different textures to a sprite, remember that for these changes to appear, you must always rebuild your atlases. Press Play Due to some oddities that can happen with the way Unity updates the scene and game views, sometimes the quickest thing to try is to just press the "Play" button and then stop it again. This will often reveal changes you have made in the editor. Inactive Objects If your sprites/controls are attached to an inactive (sometimes called "disabled") GameObject in the scene, these sprites cannot be included in the atlas build. The solution is to link them to a prefab, and then use the "Scan Project Folder" option when building your atlases. See Building Atlases for more details. Sprites Not Showing Prefab Changes When you rebuild your atlases using the "Scan Project Folder" setting, the atlases should be rebuilt using information from all the prefabs discovered in your project folder. However, sometimes instances of these prefabs in your scene(s) will not reflect the new values/settings of these prefabs. This is often due to having made changes to settings of the instances directly, which "override" these same settings from the prefab. For this reason, it is strongly recommended that you do all your editing to the original prefabs and not the instances in your scenes. If this overriding occurs, you can always right-click on the object's inspector and select "Reset/Revert to prefab" which will re-connect all values to the original prefab. If this does not solve the issue, see the next item below. Prefab Instances Still Not Updating Sometimes instances of a prefab will not reflect the new prefab values while the current scene is open. Try re-opening the scene and the prefab instances should now reflect changes made in the source prefab. |
Atlases not getting built
Check the Material Make sure you have assigned the correct material to the sprite. Check the "Scan Project Folder" setting Because Unity iPhone is missing some of the prefab-handling features of "regular" Unity, checking this box may result in no atlases being built on Unity iPhone if you are not storing your sprites in prefabs. If you wish to build your atlas(es) based solely on sprites in the current scene, uncheck "Scan Project Folder". However, if you have sprites in other scenes or prefabs which use the same material, and therefore the same atlas, you will want to instead to link all of these sprites to prefabs, and then build the atlases with "Scan Project Folder" checked. As a rule, it is always best to link your sprites/controls to prefabs, and then make all modifications to the prefabs directly, letting your scene instances get updated from the source prefabs. This ensures that when you build your atlases with "Scan Project Folder" checked, that all sprites in all scenes will be included in the atlas build and get updated with the new UVs. |
Sprites are messed up after atlas build
Press play Immediately after building your atlases, it is sometimes possible that the sprites will not reflect their new UV locations and instead will still have UVs pointing to the old positions on the atlas. This can be easily remedied by pressing the "Play" button briefly, then stopping. Use Prefabs If after building atlases for sprites in one scene you find that sprites in another scene, or prefabs, no longer appear correctly, you probably need to use prefabs for your sprites. Once all your sprites are linked to prefabs, build your atlas(es) with the "Scan Project Folder" option checked. This way, all prefabs get updated and included in the build, and all sprites in your various scenes will update themselves from their prefabs. |
Atlas loses some textures
Use Prefabs If after building atlases for sprites in one scene you find that sprites in another scene, or prefabs, no longer appear correctly, or that your atlas(es) no longer contain the images of sprites in another scene, you probably need to use prefabs for your sprites. Once all your sprites are linked to prefabs, build your atlas(es) with the "Scan Project Folder" option checked. This way, all prefabs get updated and included in the build, and all sprites in your various scenes will update themselves from their prefabs. |
Colors don't appear correct, or are washed out/too bright
Unity 3 and Windows Presently, Unity 3 has a bug on its Windows version where the red and blue color components are swapped when using vertex coloring (the method used by EZ GUI). Check the material's Main Color If you are using one of the shaders that comes with EZ GUI, you will notice that when you first import the EZ GUI package, the default color of the included Sprite Material's "Main Color" is gray (128,128,128,255). This color will produce accurate coloring on sprites with the default color of full white (255,255,255,255). Normally, it is recommended to leave the "Main Color" setting of the material to its default gray so that if you want a sprite to appear like its original artwork, you simply leave its color set to white. However, raising the "Main Color" value above its default value can allow you to achieve highlighting effects. If you set the "Main Color" to white, for example, then for the sprite's coloring to match the original artwork, its color setting must be set to gray (128,128,128,255). Colors above this will cause the sprite's colors to appear "over-bright". This can come in useful if you want to highlight an object, for example. However, if you are experiencing this issue unintentionally, you can resolve it by setting the "Main Color" of the material back to its default gray. |
Images or text appear blurry
Even when using Pixel Perfect, the Unity renderer may generate somewhat blurry results depending on what settings you use for mip mapping and texture filtering. If you desire pixel-perfect rendering, it is recommended that you disable mip map generation for the generated texture atlas and change the texture filtering mode to "Point", as well as disable compression. Disabling mip map generation will also save memory and would not be used anyway if the object is always displayed pixel-perfect. On the other hand, if you intend to scale an object up or down from its pixel-perfect size, it is recommended to use bilinear or trilinear filtering. It is still generally not recommended to enable mip mapping, but this may differ from project to project. |
Text appears empty or garbled
If you generated your font atlas using Hiero, Hiero has a bug that can crop up where a font atlas will be flipped vertically. If this happens, the font text will appear either transparent, or garbled. To fix it, you just need to open the font texture in an image editing application and flip it vertically. One such application is the free, cross-platform image editor known as Gimp (www.gimp.org). For solutions to other issues that can arise when using Hiero, please see this online troubleshooting guide for Hiero. Another possibility is that the font atlas is non-square, but you have set the font atlas to use compression which requires the texture to be square, and so Unity is resizing the texture itself, thus throwing off the atlas coordinates. Try re-generating the font atlas using a square canvass. |
Font characters appear misaligned or irregularly spaced
This can occur for one of two reasons: 1) The font atlas is non-square, but you have set the font atlas to use compression which requires the texture to be square, and so Unity is resizing the texture itself, thus throwing off the atlas coordinates. Try re-generating the font atlas using a square canvass. 2) The font texture is using point filtering. See the description of this problem here. |
Adjacent sprites have gaps between them
If you have two sprites/controls which are exactly adjacent, but there is a gap sometimes showing between them, then check to see if you are using point filtering for your atlas. If so, this is a well-known issue in both Direct3D and OpenGL that can occur when a texel falls on the border between two pixels. Rounding errors during rendering can cause the texel to "jump" from one pixel to the next. A good solution for this is to make sure your text sits in the "middle" of a screen pixel, by offsetting its position by half a pixel. This can be done easily by using an EZScreenPlacement component and specify a screen position that on the half-pixel. For example, if you had your object positioned at 64,64 on-screen, set it to 64.5,64.5. This will have the object positioned so that its texels sit in the "middle" of screen pixels, and not at the borders where they are subject to rounding errors.
|
Sprites are the wrong size
Press Play Since Unity will not report accurate camera settings for the Game View while in edit mode, if you have just enabled pixel-perfect on a sprite or control, you may need to press the Play button briefly to get the correct information to the object. Check the Game View Unity 3 introduced a bug where if the Game View is not visible when you click Play, then it will report incorrect camera information to the objects in the game at startup. To work around this, make sure the Game View is visible before pressing Play. Check your texture import settings Unity 3 may sometimes resize your textures based on their import settings. Compression: If you are in iOS mode and have "Override for iOS" checked, then check to see if the texture format is set to compressed. If so, because iOS compression (PVRTC) requires that textures be square, Unity will resize your texture. This can happen both to source textures (which require no compression since they are not used at runtime) as well as atlases. Simply either uncheck the override option, or change the texture format to one of the "Truecolor" settings, or other uncompressed formats. If you require PVRTC compression, then when building an atlas you wish to be compressible, check the "Force Square" option in the Build Atlases wizard. This will produce a square, PVRTC-compatible texture without distorting your texture or sprites. Power-of-2 resizing: If your texture is set to size to the nearest power-of-2, then if the original texture is not already a power-of-2 in both dimensions, it will be resized by Unity, distorting its appearance on the final atlas. This setting should be set to "None" for source textures. Check the Render Camera setting Sprites and controls size themselves based upon the camera that will be rendering them. So make sure if you are using a camera other than Main Camera to render the object that you assign this camera to the object's Render Camera setting in the inspector or at run-time using the SetCamera() method. Use the Size Sprites wizard Sometimes when using the Pixel Perfect feature, sprites will appear correctly at runtime, but will appear the wrong size while editing. This is a result of an oddity in Unity where sometimes the cameras in the scene do not report the correct viewport dimensions. To get around this, you can use the Size Sprite wizard to size your sprite to the desired size. NOTE: You will need to disable Pixel Perfect on the sprites in question for the Size Sprite wizard to alter their sizes. Once altered, leave Pixel Perfect off and they will remain the desired size. The only drawback to this approach is if your game changes resolutions but you want the sprite to still render pixel-perfect, it will not automatically resize to do so. In such a case, you can turn pixel perfect back on in script at runtime and call CalcSize() to cause the sprite to draw pixel perfect again. |
"Unable to find required resource..." message
When using Unity iPhone 1.7 and one of custom editor windows, you may receive the following error message: Unable to find required resource at 'Editor Default Resources/Builtin Skins/Lucida Grande.ttf' This appears to be a bug in Unity iPhone where it is unable to find its own built-in GUI skin resources. You can safely disregard it. This bug has been fixed in later versions of Unity. |
Sprites drawing over each other / Z-fighting
This is usually a result of imperfections in Unity's depth-sorting algorithm. When blended objects are drawn, they are sorted according to their distance from the camera. However, it is not according to the distance of the nearest point of the object, but rather according to the distance of the center of the object to the camera. This means that sometimes an object that is supposed to appear behind another can actually be drawn in front of it because its center point is nearer to the camera. Here are a few suggestions you may try to resolve this: Use an orthographic camera The problematic aspects of the depth-sorting algorithm are eliminated when using an orthographic camera, so as long as one object is slightly in front of another, it should almost always be rendered in front. Increase separation Often the difference in distance from the camera between two conflicting objects in a situation like the one mentioned above is very small. This means simply increasing the separation of the two objects can usually result in fixing the problem. Allow more Z-precision Sometimes, the two objects are actually positioned correctly relative to the camera, but the differences in their distances is so small that there is not enough numeric precision for the renderer to correctly order them. In such a case, there is something you can do to increase the available precision. Try selecting your camera and reduce the "Far clip plane" value. For many games, the default value of 1000 is much more than you will need. The less the difference between the far clip and near clip values, the more precise and accurate comparisons of small distances can be. Use managed sprites/controls Managed sprites are not sorted automatically by depth as they all exist together in a single mesh. You can, however, manually control the drawing order of managed sprites by setting the drawLayer value in the inspector, or by calling SetDrawLayer() at runtime. Use a shader that uses the depth/Z buffer One of the easiest fixes to this problem is to switch to using a shader the performs depth-testing. This means objects will occlude each other based upon their Z-buffer values, rather than based on distance from the camera. For example, try using the Sprite Cutout shader included with this package. NOTE: There can be performance implications when using a cutout shader on iPhone. |
More draw calls than expected
Sometimes you may find that you are incurring more draw calls than expected. First, please note that until Unity desktop adds batching support (which should be coming soon), sprites will not be batched together in Unity desktop automatically. You can, however, use managed sprites in this case (see Managed Sprites). On Unity iPhone, batching is automatic, however there are several things that can cause even sprites of the same material to generate more than one draw call: Changing Material Properties Changing any of the properties of the material used by a sprite, such as the UV offsets or material color, will cause Unity to internally duplicate that material, thereby creating an additional material, resulting in an additional draw call. Instead, if you want to do something like change the color of a sprite, be sure to use the sprite's SetColor() method instead. Blended Shaders Using a blended shader can sometimes interfere with desired batching behavior. To understand why, it is important understand what "batching" actually is. Put simply, when multiple objects are "batched" together, they are drawn all at once. When a polygon uses a blended shader (a shader that allows for varying levels of transparency), however, Unity has to make sure that things behind the blended polygon get drawn first. Think of a stained glass window, for example. If the window were drawn first, you would either have to draw what is behind it on top of the window (BAD), or not draw what is behind the window at all (effectively making the window appear to be opaque). Instead, whatever is behind the window must be drawn first, then the window gets "blended" on top of that. With this information in mind, consider the scene in figure 1: 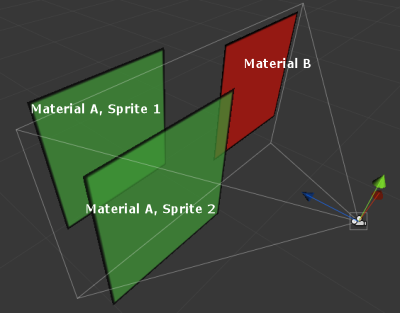
Here we have two translucent green sprites that share a material which uses a blended shader. When batching meshes which use blended shaders, Unity checks the distance of each from the camera to determine which ones must be rendered first. If all that was visible were the sprites which share material "A", these two would first be sorted by distance from the camera (called the "depth"), then rendered in a single batch (a single draw call). However, we also have a red sprite which uses a different material (material 'B') in the scene. Depth-wise, the red sprite is "between" sprite #1 and sprite #2. Even though they may not actually overlap from the perspective of the camera, Unity considers the red sprite to be "between" the two green sprites, and therefore determines that to ensure that the blended sprite #2 appears correctly, it must render the scene like so:
As you can see, the material is set a total of 3 times, meaning this scene requires 3 draw calls even though there are only 2 materials in use. So what can be done to keep draw calls to a minimum? First, you can probably tell from figure 1 that the red sprite, from the camera's perspective, does not overlap the green sprites. So for a scene such as this, the red sprite could simply be moved forward or backward so that it no longer sits "between" the depth of the green sprites. This way, Unity can draw the green sprites together using material 'A' since both will either be drawn after the red sprite (if they are "in front") or before it (if they are "behind"). In either case, they are drawn together in one pass. Second, if the red sprite must sometimes be sandwiched between sprite #1 and #2, you may reconsider whether you want the green sprites to use blending in the interests of saving draw calls. If a non-blended shader is used, (a shader which does not allow translucency and uses the Z-buffer to draw it atop other objects such as the "Sprite Cutout" shader supplied with this package) the sprites using material 'A' no longer have to be split into two draw calls because Unity can draw them together, using the Z-buffer to decide which parts should be drawn on top of the red sprite. You can still achieve a sort of transparent effect with the Sprite Cutout shader, which employs alpha testing to not render transparent portions of the sprite. You just can't achieve a translucent (partial transparency) effect. NOTE: alpha testing can have a performance impact on iPhone, so weigh this overhead against the trade-off of fewer draw calls when deciding which shader to use. Third, if at all possible, use the same material for the green sprites as the red sprite. If you can fit the sprites together onto the same atlas and use the same material, then even if one is "between" the others, they can all be drawn together in a single batch. Sometimes, it may be worth it to duplicate some images on multiple atlases if it means that by doing so you can have all sprites in view (or at least all in a certain "depth region") using the same material. Finally, objects with difference transform scales will not batch together. For two objects to batch, their scales must match exactly. Fortunately, EZ GUI and SpriteManager 2 provide a width and height setting for all sprite-based controls which you can use to resize your controls without altering their scales. |
How do I make a control always face the camera?
It is important to note that EZ GUI controls are drawn in world space, rather than screen space. There are several advantages to this, but it does mean that working with the controls is somewhat different than working with controls in screen space. If you have a camera that moves around the scene or rotates and you need your controls to always face the camera, simply make the controls a child of the camera object. This way, they will move and rotate with the camera. |
Controls/panels move in unexpected ways
This is usually caused by a "rogue" transition element remaining on one or more transitions. Go through each transition (remember that on controls, there are multiple "From" transitions for each state) and verify that only the intended elements are present. NOTE: For convenience, when you begin adding elements to a transition for the first time, the other transitions in the same group will automatically copy the settings you assign. This prevents you from having to setup each transition over again from scratch. However, if you change any part of the other transitions in the group, the changed transitions will no longer automatically clone settings as they now have their own unique settings. This means if you change your mind and go back and remove the elements you added to the first transition, you must remember that the other transitions in the group still have their own unique settings. You should either go to each and manually adjust the elements desired, or if you want to re-set the other transitions to clone the one you have selected (including cloning them to be empty), just click the "Clone" button. |